This page is suposed to be a small guide on how to use the MOG2-EDITOR. The editor is currently (at the time of writting this lines) in the earlier version 0.5 so it still is not able to edit some of the parts of the game. Even the file format used to save the maps is going to change in future versions. The only purpose of these earlier versions is to obtain some feedback in how the editor is progressing. The editor also contains the game engine, so that you can play to all the maps you edit (see the PREVIEWING A ROOM section).
Tutorial 1: How
to make a room
Tutorial 2: How to make a
simple enemy
Tutorial 3: How to
create interactions
Let's start by the structure of a GAME: a game is
composed of several maps. Each map represent a different area in
the game (i.e. the castle in MOG or one of the ten worlds). Each
map is composed of several rooms. Each room contains some objects
and background. Therefore, the editor is divided in several
parts:
- The game view
- The map view
- The room view
- The object view
When the editor executed, the game view is first shown. But from it you can access all the other views as will be explained.
The object view allows you to create new objects (wals, enemies, characters, etc...) for using in a game. It also allows to grab tiles from graphic files in order to use them for the objects. Once some objects have been created, we are ready to create a game.
The first thing we have to do is to create a MAP in the game view. Once we have created a new map, we can edit it entering in the map view and add rooms to it. To edit the rooms, we can enter in the room view, where the objects created in the object view can be added to the rooms.
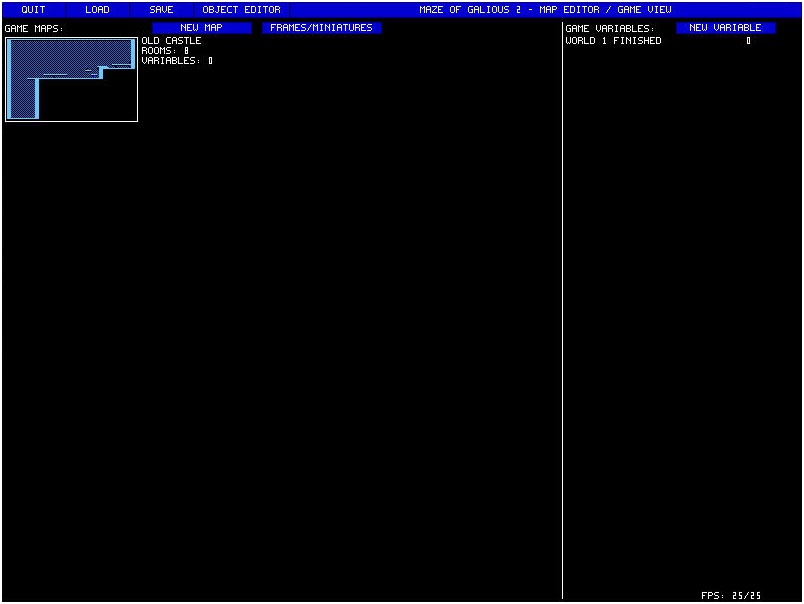
The game view is the one that give us a global view of the game. In the game view we can create and edit new maps and new game variables. The maps represent the different areas of the game, and can be filled with rooms. The variables are used to manage the events of the game. There are 4 levels of variables: object variables (that have a scope including only one object), room variables (with room scope), map variables (with only in-map scope) and game variables. The game variables are used to manage events in the most global level, i.e. an event in one map has some influence in an object of another map. The map variables have only "map scope", meaning that the events that they control can only relate objects inside one map.
To create a new map you have only to click in the "NEW MAP" button. Inmediately a new map will be created. To change the name of the map, you can right click in the current name, and a dialog will appear where you will be able to change the name. To edit the map, you can right click on the miniature view of the map and a context menu will appear, where you can select "EDIT MAP".
To create a new game variable, you only have to click in the "NEW VARIABLE" button, and then by right clicking on its name or initial value you will be able to modify them
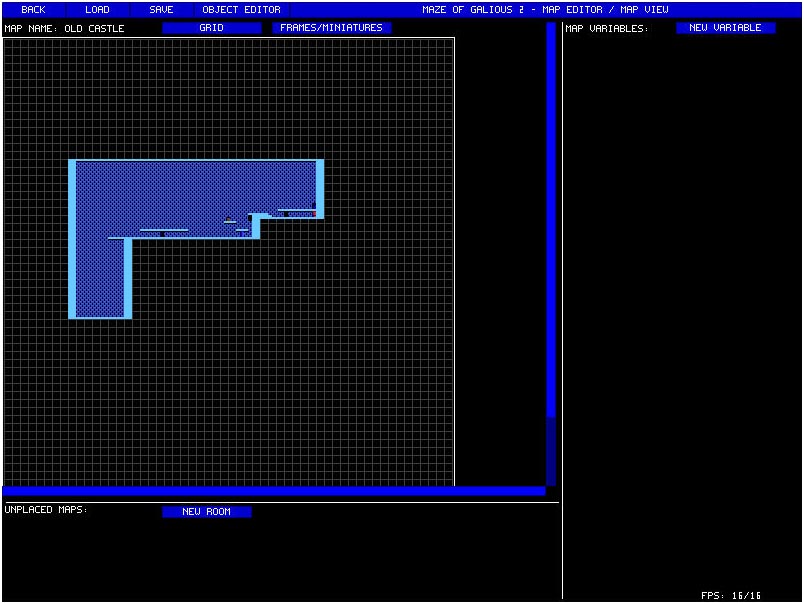
In the map view, you will be able to create rooms and map variables. The screen in the map view is divided in three zones. The map preview (top-left), the set of "unplaced" rooms (bottom-left) and the map variables (right). The set of "unplaced" rooms shows the set of rooms that you have created, but for which you still haven't defined their position in the map.
To create a new room just click in the "NEW ROOM" button in the lower part of the screen. A new room will appear inmediately under it. By right clicking this room, you can access a contextual menu from where you can delete, edit, copy or place the room in the map. When you select the "PLACE ON MAP" option, you have to choose a location in the map to place the new room. Notice that to help you in this duty, the rooms can be aligned to a grid.
To edit a room (placed in the map or not), just right click on it and select "EDIT ROOM". Then you will access to the room view.
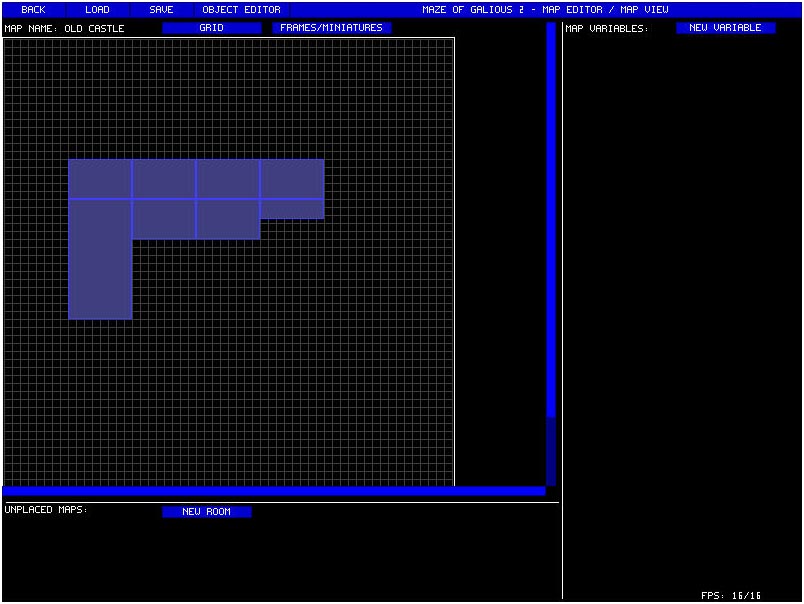
By pressing the "FRAMES/MINIATURES" button, you will switch between seeing onñy the frames of the rooms, or seeing miniatures of the rooms. The previous picture showed a miniature view. The next picture shows the same map, but using frames:
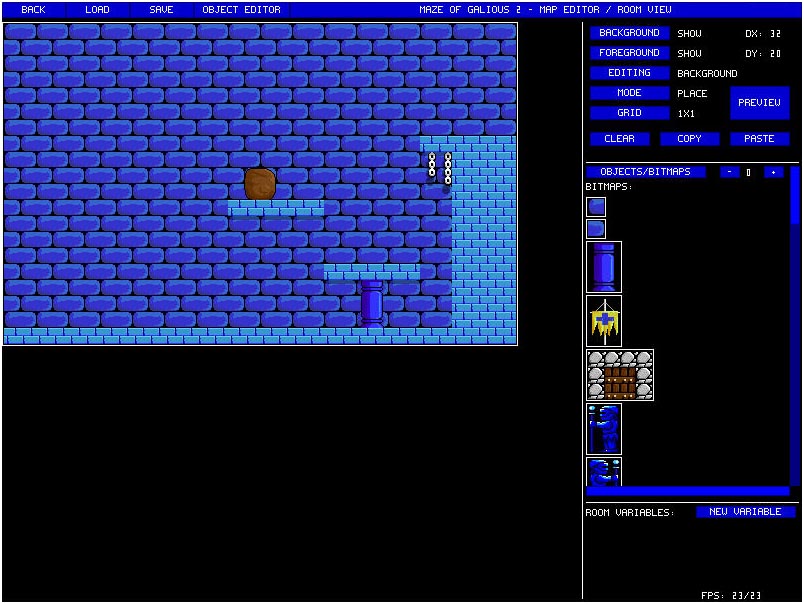
This is one of the most important views. In the room view you can place objects and tiles in the rooms. On the left part of the screen you can view the room and on the left part you have the tools. To understant how to edit a room, let's first explain how a room is represented. A room consist on 2 parts: the background and the foreground. On the top of the tools palette you can select whether to display or not the background or the foreground layers. And also you can select which of the two layers you are currently editing. It's up to you to distribute the tiles and objects of a room between background and foreground.
On the top-right of the room you can also change the dimensions of the room, by right clicking on them.
Another relevant button is the MODE button. You can switch between PLACE, ERASE and REGION modes. In the place mode, you will place objects one by one, in the erase mode you will be able to erase objects by clicking them on the room, and with the region mode, you will be able to fill regions with an object. Note that you can set a grid to help you in placing the objects.
Just below the MODE button you wil find the CLEAR, COPY and PASTE buttons. The CLEAR button allows you to delete the background, the foreground or both. The COPY buton allows you to copy the content of the current room to a clipboard, and with the PASTE button you will be able to copy the content of the clipboard to the current room. It is important to note that there are 2 modes of paste. The normal mode and the pattern mode. With the normal mode, the exact content of the clipboard will be copied to the current room, and in the pattern more, the content of the clipboard will be copied as a pattern in the current room and will fill the entire room (this is very usefull for drawing backgrounds).
In the middle right part, we see the obejcts
palette. From here we can select which object or tile to place in
the room. The difference between an object and a tile is that
tiles don't have any properties, they are just graphics, and
objects can have properties (as being solid, or being enemies,
having bahaviours). Therefore, the walls must be obejcts instead
of tiles, because they have the porperty of being non
traspasables.
If we look at the top right part of the room view. We can see a button labeled PREVIEW. When pressing the preview button. The game engine will be launched, allowing us to test a room (or even a complete map or game) walking around with a character.
Once pressed the button, this dialog will appear:
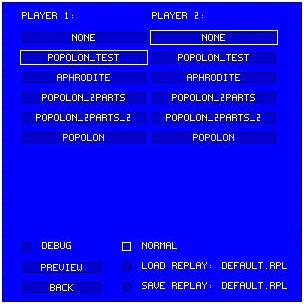
From this dialog you can select several
things:
- The CHARACTERS to use in the preview: there are two columns of
buttons containing all the CHARACTER objects defined. If you
choose only a character from one of the columns, that will be the
character used in the preview. Moreover, if you select a
character from each row, then you will play in 2 player mode.
- The INPUT mode: it is NORMAL, LOAD REPLAY or SAVE REPLAY. If you choose NORMAL, you will control the characters with the keyboard. If you select SAVE REPLAY, you will control the characters, but all your keypresses will be stored in a file (that you can change by clicking over it). Finally, if you select LOAD REPLAY, the keyboard will have no effect, and the keypresses will be readen from a file of your election.
- DEBUG/NO DEBUG: if you set the DEBUG flag, the preview will start the DEBUGGER instead of a normal preview. See next section for instructions on how to use the debugger.
To start a preview, press PREVIEW, and to return to the editor press BACK. The following puicture shows a view of the preview window, in a 2 player mode without debugging:
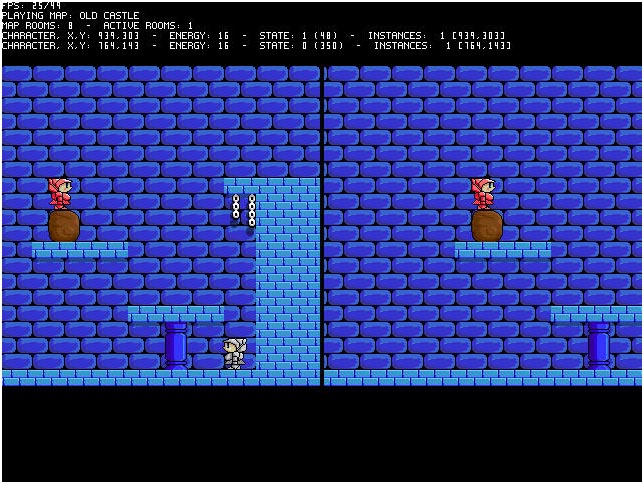
In the top part of the screen, some information is
visualized:
- The FPS counter shows two numbers, the FPS needed (25), and the
maximum FPS that your computer can achieve.
- The name of the MAP in which you are playing.
- The number of rooms of the map, and the number of rooms that
are kept active in memory.
- Finally, for each character, its coordinates, state, etc. is
visualized for debuging purposes.
If you start a preview with the DEBUG flag activated, the debugger will be started. Here you can view a screenshot of the debugger:
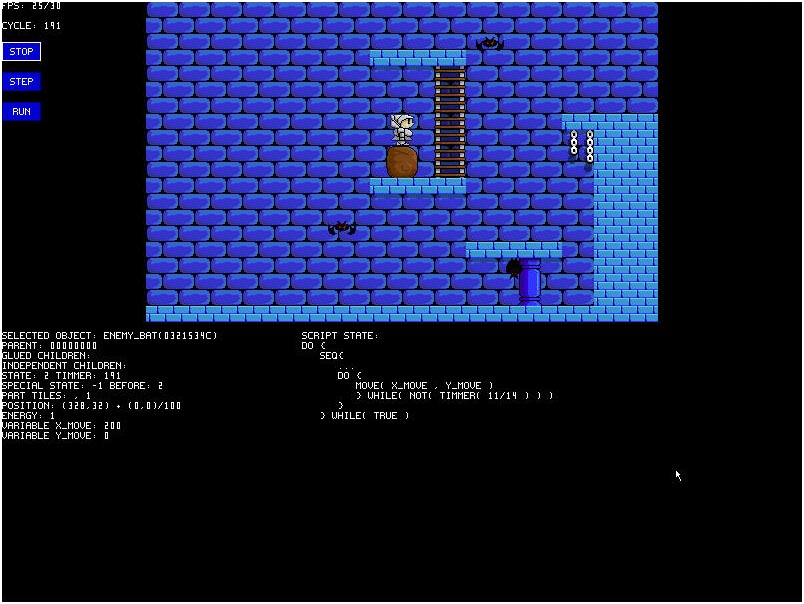
The DEBUGGER gives you control over the execution
of the game to see how things evolve in the screen. On the
top-left part of the screen, you will see the current CYCLE
(starting on 0). And the three main control buttons:
- STOP will pause the execution
- STEP will execute just a cycle of the game and then will
pause
- RUN will resume the game at the normal execution speed
Moreover, in the DEBUGGER you can see the internal
state of any object in the game. Just click over an object
(enemy, character, etc.) and its information will appear in the
lower part of the screen. In the previous screenshot, the
top-right BAT is selected. For each object, this information is
displayed:
- SELECTED OBJECT: Object name and pointer
- PARENT: If the object is a CHILD object (eg: an arrow, shows
the pointer to the parent)
- GLUED CHILDREN and INDEPENDENT CHILDREN: are the lists of
children of the current object
- STATE: shows the current state of the object
- TIMMER: shows the value of the internal timmer of the object
(internally used by some commands)
- SPECIAL STATE: shows if there is some CONDITIONAL STATE
executing. The BEFORE field shows the state in whitch the object
was before executing the CONDITIONAL STATE.
- PART TILES: shows the TILE numbers of each of the PARTS of the
object (as the BAT is composed just of one part, a single number
is displayed)
- POSITION: shows the current position of the object
The rest of values is the value of the local variables of the object.
On the lower right part of the screen, the ACTION SCRIPT of the current state is shown at its current state. For instance, in the previous screenshot, we see that the BAT is executing a DO-WHILE statement with a TIMMER termination condition. The "11/14" indicates that 11 of the 14 cycles that the DO-WHILE will last have been executed.
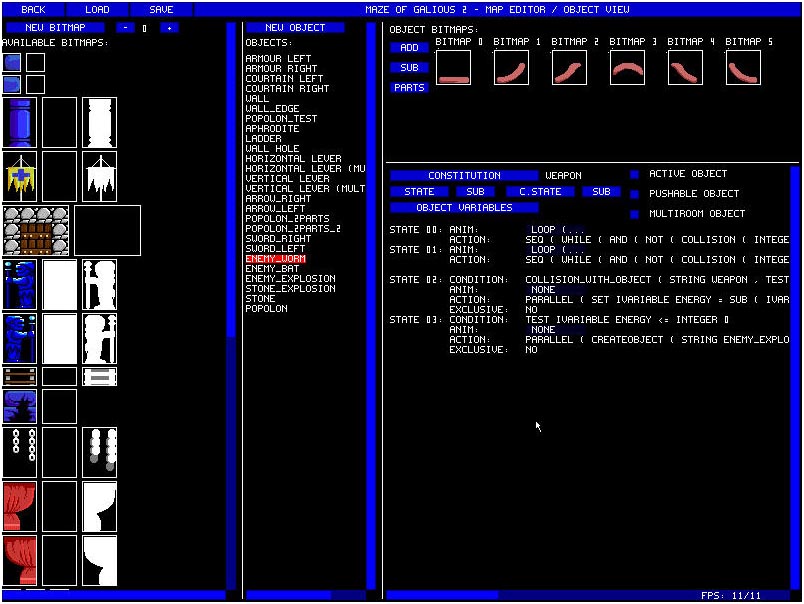
The object view is accesible from all the other views just by clicking in the OBJECT EDITOR button present in the top bar. In the object view you can create two things: bitmaps and objects. A bitmap is just an image with a collision mask and a transparency mask. An object is a more complex entity, and can have several bitmaps, and preperties.
The left-most part of the object view show the bitmap banks. There are 256 different banks of bitmaps. You can add bitmaps to any of them, since their single purpose is to allow you to organize better the different bitmaps instead of having a single and huge list of bitmaps.
To add a new bitmap, press the NEW BITMAP button and select a graphic file. You will enter in the BITMAP GRABBER. Using the bitmap grabber, you can grab parts of the graphc file to be used as bitmaps. After selecting a part of a graphic file to be used as a bitmap, the editor will ask you if you want the transparency mask to be: NO MASK, AUTOMATIC MASK or FROM BITMAP. If you choose NO MASK, the tile will be completely opaque, if you select an AUTOMATIC MASK, the obejct will be transparent in all of its points that have color black and if you select a FROM BITMAP mask, the editor will use as the transparency mask, the part of the graphic file inmediately on the right of the part used as the bitmap (see the file popolon.pcx for an example). Anyway, you can change the transparency mask later from the editor, just by right clicking on the tiles.
The collision map can also be assigned by right clicking a bitmap in the bitmap list. If you select a FROM BITMAP collision mask, the editor will take the part of the image just on the side of the transparency mask in the graphic file as the collision mask. In other words, if you select a bitmap from a graphic file that is in the coordinates: (100,100), and that bitmap is of 32x32 pixels, the zone of 32x32 pixels starting at (132,100) will be used as the mask for transparency and the zone of 32x32 pixels starting at (164,100) will be used as the collision mask.
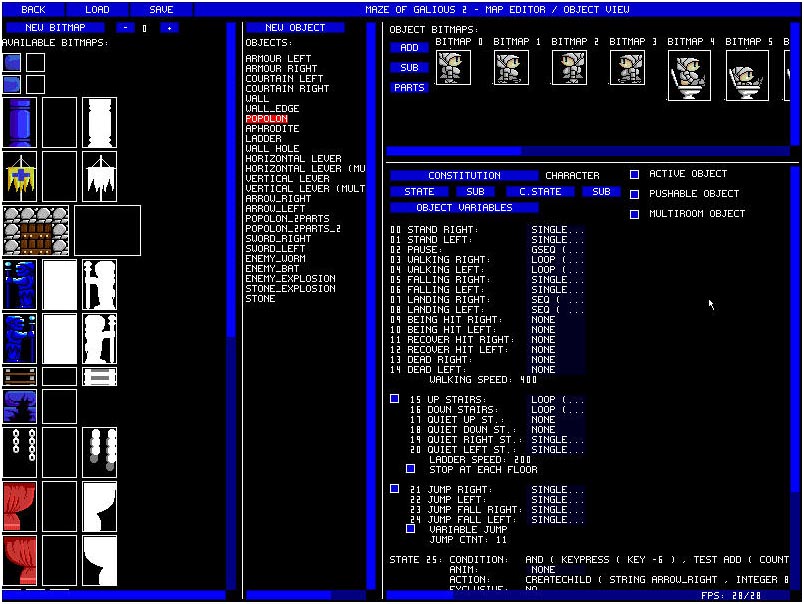
Once you have grabbed some bitmaps from graphic files, you can create objects. To create a new object, just click in the NEW OBJECT button. A new object will be created (you can change its name by right clicking it). When you select an object, its properties appear in the right-most pare of the screen.
The properties of an object are divided in two parts: the upper part of the screen shows the bitmaps currently asociated with an object, and the lower part of the screen shows the properties of the object. To assign bitmaps to objects, just click in the ADD and SUB buttons to set how many bitmaps you want to assign to an object. Some empty boxes will appear labelled "BITMAP 0", "BITMAP 1", etc. By clicking in these labels, you will see that the box under the label turns red. Now, if you select one bitmap from the bitmap list in the leftmost part of the screen, the bitmap will be asociated to that object inmediately.
An object can be a very simple structure, but also a very complex one. An object can be build by several parts (up to 16), each one having an independent animation. Those parts are linked together using LINK points. Moreover, an object can have CHILD objects. I.e. we can have hierarchies of objects. CHILD objects can only be created using the ACTION SCRIPTS. Inside the hierarchy, each object has a PRECEDENCE. The precedences are relative to its parent precedence. For instance, if an object has precedence -100, this means that the object has 100 points less of precedence than its parent. The precedences are used just for drawing them: obects with higher precedence are drawn on the top, and objects with lesser precedence are drawn on the background.
Around the white box that surrounds each bitmap you will see two white spots. Those white spots mark the HOT_SPOT of the bitmap. To change the HOT_SPOT, you can right click the bitmap and select SET_LINKS. Then the LINKS dialog will be shown to you:

In the LINKS dialog, you can define special spots on the bitmaps. Those special spots will be used for linking bitmaps together. For instance, if you create a Popolon consisting in 2 parts: the legs and the torso, you must define the points in which the two parts will glue together. By pressing the + and - buttons, you can change the number of LINKS (16 is the maximum), and with the < and > buttons you change the current edit link. The current edit link is shown in RED colour in the screen, and the rest of links are shown white. To change a link, just click in the magnified image of the bitmap on the right of the LINKS dialog and the link will be changed. The LINK 0 is a special one, and is considered as the HOT_SPOT of the bitmap.
By the ADD/SUB buttons to asociate bitmaps to an object you will also find the PARTS button. The PARTS button allows you to change the STRUCTURE of an object. Objects can be build of PARTS (16 is the maximum), and those parts can be linked together to form the complete object. If you press the PARTS button, you will see the PARTS dialog:

In the PARTs dialog, you can change the number of parts that each object has, and how are they linked together. Currently the dialog is not very "user-friendly", but it is just a preliminar version of the final one. Using the + and - buttons, you can change the number of parts, and with the < and > buttons under it, you can change the current editing part. If you press the VIEW button, you will switch from the BITMAP to the BOXED mode and viceversa. In the BOXED mode, only the bounding boxes of the bitmaps will be shown, and in the BITMAP mode, the full bitmap is drawn. If you press the TILE button, you can change the DEFAULT tile for the current editing part.
Under that buttons, there is the label "PART LA
LB", that is just an abreviation of "PARENT PART - LINK A - LINK
B". That mean that the three pairs of buttons under the label
change precisely those three elements:
- The parent part is the part to whitch the
current part is linked to: the part 0 is allways the root part,
so the parent part for the part 0 is ignored.
- Link A, is the link of the parent part to
witch the current part is glued to.
- Link B, is the link of the current part linked
to the parent part.
The lower part of the object properties window,
shows the physical and logical properties of an object. The main
property of an object is the CONSTITUTION. The constitution of an
object determines its basic nature, there are different posible
constitutions:
- NONE: the object is traspasable by the players.
- SOLID: the object is not traspasable by the players.
- LADDER: the object is climbable by the players.
- ENEMY: the object will harm the characters if they touch
it.
- CHARACTER: the object is a character itself.
- ITEM: an ITEM object is exactly as a NONE object. However this
constitution has been added to facilitate the collision detection
scripts (as you will see is you try to make a game).
Each object can have several states. To ADD/SUBSTRACT new states, you can press the "STATE","SUB", "C. STATE" and "SUB" buttons just below the constitution. There are 2 types of states: NORMAL STATES and CONDITIONAL STATES. The CONDITIONAL STATES are executed when certain conditions are met. Only one conditional state can be executing at a single time.
For each NORMAL STATE, you can specify an
ANIMATION SCRIPT and an ACTION SCRIPT. The animation script
specifies the sequence of bitmaps that the object will display.
You have to specify an animation script for each one of the
different parts of an object. For instance, on the picture below,
you see that an HORIZONTAL LEVER has a single part, and only one
animation script is specified for each state, but on the picture
above, to specify POPOLON, I used 2 parts, and therefore 2
animation scripts are specified per state. The action script
specifies the behavior of the object (i.e. if it has to move, or
change of state). In the picture below, you can see the
specification of an horizontal lever. We can see that it has 2
states (one for going left, and the other one for going right).
As the levers don't have any animation, the animation scripts are
both: "SINGLE(0,0)", that mean that they will always be drawn
using the BITMAP 0. But each one have a different action script,
each one specifying the conditions that have to be met to change
of state. For a more precise explanation of the action and
animation scripts, see the following
subsections.
For each CONDITIONAL STATE, you can specify the ANIMATION SCRIPT and the ACTION SCRIPT, but also a CONDITION SCRIPT and the EXCLUSIVE FLAG. The CONDITION SCRIPT of each conditional state will be teste at every cycle, and when one of them is met, the conditional state is executed. If the state is exclusive (exclusive flag activated), the NORMAL STATE in which the object was is nomore executed, and if the state is not exclusive, both the current normal state and the conditional state will be executed in parallel.
If you set the constitution CHARACTER or an object,
the list of all posible states will appear. At the right side of
the name of the states, you will have the ANIMATION SCRIPTS for
each state. These scripts define the animation that the character
will have in each state. You can edit those scripts be clicking
at them (initially all the scripts are void (NONE)).
All the characters have a set of basic states: walking, falling,
being hit, etc. and can optionally have extended states: jumping,
climbing stairs, etc. You can also add CONDITIONAL STATES to the
Character objects, but not NORMAL STATES.
For each object. Not only the
constitution and the states have to be defined. Each object has
also several flags that specify some behaviors. Currently, the
available flags are:
ACTIVE OBJECT FLAG: Only the rooms with active objects on them
remain active in memory. Once all active objects have left one
room, this room is freed from memory, and if the character comes
back, it is reloaded from the disk and reset to its initial
conditions. Therefore, the characters are Active objects by
definition. But this flag has to be unchecked for walls, and all
the furniture objects that you define. As more active objects you
define, the more rooms that have to be kept in memory, and the
slower the game will run.
MULTIROOM OBJECT FLAG: When an object exits a room, it the
multiroom flag is checked, the objects moves to the adjacent
room, otherwise it disapears. For instance, the elevators and the
characters are multiroom objects, but the bullets (as arrows,
etc.) are not multiroom, since when the reach the border of the
screen, they have to disappear.
PUSHABLE OBJECT FLAG: When a solid object moves, all the
pushable objects that are moved with it. That means, that if you
drop a pushable object A over an elevator, this object will carry
the object A with it. Characters and enemies (coins, arrows,
etc.) should be pushable objects.
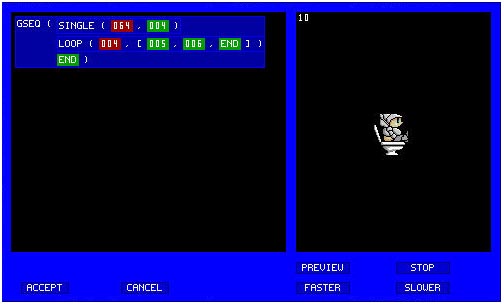
The animation scripts are simple way to define
animations for objects. An animation script is a sequence of
commands. There are 6 different available commands:
- NONE : no animation.
- SINGLE ( t , tile ) : during "t" frames, the objects will be
drawn using the tile "tile".
- SEQ ( t , [tile1, ... , tilen] ) : the object will use the tile
"tile1", then the "tile2", etc. in periods of "t" frames.
- LOOP (t , [tile1, ... , tilen] ) : equal than SEQ, but will
restart once it reaches the end.
- GSEQ ( script1, ... , scriptn ) : the "script1" will be aplied,
the the "script2", etc.
- GLOOP (script1, ... , scriptn) : equal than GSEQ, but will
restart once it reaches the end.
In the animation script editor, to change a command (blue boxes), just left click on it, and to delete it, right click on it. To modify a "t" value (red boxes) or a "tile" value, left click on it. To add new steps to the SEQ, LOOP, GSEQ or GLOOP commands, just left click in the END button (green box). Each time you left click a "tile" value, a window containing all the tiles assigned to the current object will appear, allowing you to select the one you prefer for each step. With the right mouse button, you can COPY/CUT/PASTE scripts.
On the right part of the animation script editor
you have the preview window. Just by clicking PREVIEW a preview
of the animatinon will be shown. You can change the speed of the
preview with the buttons: FASTER and SLOWER.
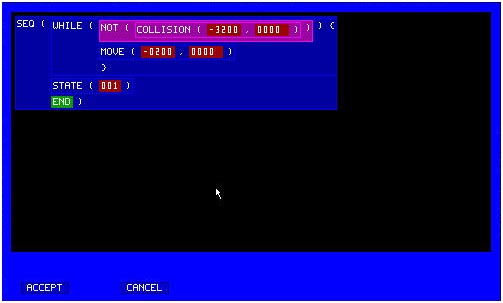
The figure shows the action script for the "going
to the left" state of an elevator.The action scripts define the
behavior of the objects. There are three categories of
commands:
- ACTION commands.
- CONDITION commands.
- VALUE commands.
The action commands just execute an action without returning any value. The condition commands return a boolean value, and the value commands return or an integer or a string. The available commands for the action scripts are the following:
- NONE: does nothing
- PAUSE ( n ): does nothing during n cycles (e.g.: PAUSE ( 3 ) is
equivalent to SEQ (NONE, NONE, NONE)).
- SEQ ( action1, ... , actionn) : performs several actions in a
sequence (i.e. the action 2 will not be started until the action
1 is finished)
- PARALLEL (action1, ... , actionn) : performs several actions in
parallel (i.e. all the actions will be started at the same time,
and only when all the actions conclude, the parallel action will
be considered finished).
- ATOMIC ( action1 ) : executes all the actions inside in a
single cycle.
- IF ( condition ) action1 ELSE action1 : if the condition is
met, the action1 will be executed, otherwise, the action 2 will
be executed.
- WHILE ( condition ) { action }: while the condition is met, the
action will be executed repeatedly.
- DO { action } WHILE ( condition ): like WHILE, but the action
is executed at least once.
- TERMINATE: The object will disapear.
- TERMINATE_CHILD ( name ): it will look for a child object with
name "name", and it will delete it.
- STATE n: the object will change of state.
- MOVE ( xspeed, yspeed) : The object will move. The speed is
expressed in percentages. So an xspeed = 100 means that the
object will move one pixel per frame in the x axis. An xpeed =
50, means that the object will move 1 pixel each 2 frames, and an
xpeed = 200 means that the object will move 2 pixels per frame.
For example: Popolon moves with speed 400 while walking.
- CREATE_OBJECT ( name , x , y ): will create a new object of
type "name" in the coordinates x,y relative to the HOT_SPOT of
the current object. The created object is stored also in the
FOREIGN register (see section 5.5.4).
- CREATE_CHILD ( name , x , y , part , link , precedence ): will
create a CHILD object of the current one, in the coordinates x,y
relative to the part "link" of the part "part", and with the
precedence "precedence". The created object is stored also in the
FOREIGN register (see section 5.5.4) .
- CREATE_GLUED_CHILD ( name , x , y , part , link , precedence ):
Exactly as the previous command, but the created object will be
premanently glued to the current object. I.e. if the current
objec moves, the glued object will also move. The created object
is stored also in the FOREIGN register (see section 5.5.4)
.
- SET variable = value : sets a variable to a certain value
- SET_FOREIGN_VAR ( name , value ) : assigns a "value" to a
variable in another object. The object is taken from the FOREIGN
register (see section 5.5.4). Notice that the variable name is a
"string" and not a "variable", since it makes reference to the
name of a variable on another object! See Tutorial 2 for an
example.
- TRUE
- FALSE
- NOT ( condition )
- AND ( condition1, ... , condition2 )
- OR ( condition1, ... , condition2 )
- TIMMER t : The condition will be true "t" frames after the
current command has started.
- COLLISION ( xoffset, yoffset ) : The condition is true, if the
object collides with some wall or object if moved
"xoffset/100,yoffset/100" pixels.
- INSIDE_ROOM ( xoffset, yoffset ) : The condition is true, if
the object is still completely inside the room after moving
"xoffset/100, yoffset/100" pixels.
- PARTIALLY_INSIDE_ROOM ( xoffset, yoffset ) : The condition is
true, if the object is still partially inside the room after
moving "xoffset/100, yoffset/100" pixels.
- SENSE_OBJECT ( name , x1, y1, x2, y2) : Tests if the box
defined by (x1,y1)-(x2,y2) (relative to the object hot-spot)
collides with an object of type "name" (name is a string).
- COLLISION_WITH_OBJECT ( constitution , condition ) : tests
whether the current object has collided with an object with
constitution "constitution" (NONE, SOLID, etc...) and if the
"condition" is met (See Tutorial 2 for an example). The collided
object will be stored in the FOREIGN register (see section
5.5.4).
- RANDOM ( v1, v2 ) : returns a random value
between v1 and v2 (included).
- +, -, *, / : aritmetical operators.
- COUNT ( name , scope ) : counts the number of objects of type
"name" (name is a string) contained in the scope. The scope is a
string that can be: "room", "map" or "game".
- COUNTCHILDREN ( name ) : counts how many children of type
"name" has the current object.
- GET_FOREIGN_VAR ( name ) : returns the value in the variable
"name" of a foreign object. The foreign object is taken from the
FOREIGN register (see section 5.5.4).Notice that the variable
name is a "string" and not a "variable", since it makes reference
to the name of a variable on another object! See Tutorial 2 for
an example.
Much more commands are specified in the "full
version" of the scripts, but the editor currently only supports
these ones.
The FOREIGN REGISTER is an internal variable contained in each object that can contain a pointer to any other object in the game. This regiter is set by the following commands: CREATE_OBJECT, CREATE_CHILD, CREATE_GLUED_CHILD and COLLISION_WITH_OBJECT and used by the commands SET_FOREIGN_VAR and GET_FOREIGN_VAR. For instance, if we want to create an object and modify the initial value of any of its variables, we can do like this:
CREATE_OBJECT( "my_object", 0 , 0)
SET_FOREIGN_VAR ( "variable_name" , 100)
This will assign the value 100 to the variable called "variable_name" of the created object.
Another use for this register is in the COLLISION_WITH_OBJECT command, for instance, if you want to test if you have collided with ano object of constitution ENEMY, but with a certain value in a variable, you can do:
COLLISION_WITH_OBJECT("enemy", TEST GET_FOREIGN_VAR("variable_ame") = 100)
This will return TRUE only if there is a collision with an object with constitution ENEMY and with the value 100 in the variable "variable_name".
Just to say again that this is a very early version of the editor, and that is still not very confortable to use, but it will be improved in future versions! Have fun!